How I learnt to Applique
When I first started to sew I answered an add on a local notice board for someone requiring help with their sewing business.I was quick to take the opportunity and after a casual meeting was handed my first pile of face cloths and towels. All had to be appliqued with names and tricky designs of unicorns and spaceships.I was extremely nervous knowing that the products would be sent interstate to upmarket boutiques.I had never done applique before so I gave myself a crash course on the technique.I think I must of been getting paid only a few  dollars an hour but being a new mum it was something to give me a little extra pocket money for coffee with friends plus I learnt heaps about applique do's and don't s.
 dollars an hour but being a new mum it was something to give me a little extra pocket money for coffee with friends plus I learnt heaps about applique do's and don't s.
So as promised I have decided it was about time I got organized and posted my first tutorial.The first tutorial is of coarse on the Applique technique.This has remained one of my most favorite and frequently used techniques so far.
Applique has so many different applications.Use it on clothing,quilts cushions,toys etc.
I want to share all the tips and tricks that I have learned so far through my own experiences so that this too an become one of your favorite stitches.
*Requirements*

- Sewing machine with open toe or clear soled foot attached
- pencil for drawing design
- paper backed fusible webbing like 'ezy fix' or 'vlisofix'
- Tear away stabilizer to prevent puckering.
- Backing fabric
- applique fabric
*Fabric choices*
Almost any fabric can be used just as long as it is stabilized and fused correctly.This may be cottons,jeans,knits silks....
*Machine Set up*
 stitch: Blanket stitch.Length and with can vary depending on desired look.If you would like a small delicate blanket stitch you can go as small as length 1 and width 1.Or you could go for a large blanket stitch so that it becomes more of a feature in your work,Lets say a length of 5 and a width of 5. Notice how my length and width are always the same? This is because we want to form an even square blanket stitch and not a squashed up rectangle.
Tension: Normal tension
Presser foot: Normal foot or if you have one a open toe applique foot or clear sole foot.These two feet are made so that you can easily see where your needle is entering the fabric for easier guidance and accuracy.
Optional:If your machine has a needle down function this can be activated for easy pivoting around corners and curves.If you dont have this feature then simply tap on the foot control to bring the needle down.
Optional: If you own a a machine that allows you to move your stitch position like the new Pfaff's or most Bernina's you may want to use this feature.Simply move the needle position to the furthermost right hand side so that all you have to do is run the edge of your applique piece down the inner right hand side of the foot for greater accuracy and speed.
Almost any fabric can be used just as long as it is stabilized and fused correctly.This may be cottons,jeans,knits silks....
*Machine Set up*

Tension: Normal tension
Presser foot: Normal foot or if you have one a open toe applique foot or clear sole foot.These two feet are made so that you can easily see where your needle is entering the fabric for easier guidance and accuracy.
Optional:If your machine has a needle down function this can be activated for easy pivoting around corners and curves.If you dont have this feature then simply tap on the foot control to bring the needle down.
Optional: If you own a a machine that allows you to move your stitch position like the new Pfaff's or most Bernina's you may want to use this feature.Simply move the needle position to the furthermost right hand side so that all you have to do is run the edge of your applique piece down the inner right hand side of the foot for greater accuracy and speed.
*Inspiration*
If you don't class your self as an artist then don't despair.There is plenty of places that you can draw inspiration from.Perfect examples are children's coloring books which often have clear simple pictures in them.Craft magazines, find these at your local library.They usually have a insert with applique designs on them. The key is to start easy.Try not to go for a complicated design with lots of curves and sharp angles.Also keep in mind that your image when drawn and fused to the fabric will be a mirror image.This is especially important when doing names.It may pay to reverse your image on photocopier first.
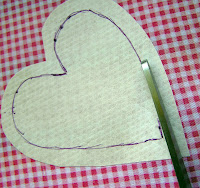
*Step 1*
Draw or trace your design to the paper side of your paper backed fusible webbing.Cut around your design leaving a 1/2" border.
 *Step 2*
Take your design and iron it on (fusible side down) on to the wrong side of your heart fabric.Let the fused design cool completely before carefully cutting it out following the drawn line.

*Step 3*
Next is to take your backing fabric and place the tearaway stabilizer behind it.Stabilizer is very important to ensure a pucker free finish.It also make your job a lot easier.It can be brought cheaply by the meter and it has a paper feel to it.Once you have completed your design it simple tears away leaving you with a perfect finish.

Now take your design and peel away the paper backing.This will reveal the fusible webbing.Iron your design onto your stabilized backing fabric and you are ready to rock 'n ' roll!

*Step 4*

Line up the edge of your fabric so that the vertical part of the stitch is running just along the raw edge of the fabric.The needle will then swing to the left to create the blanket stitch.Take it slowly until you get used to the stitch sequence so that when you approach corners you will no when to stop and pivot. make sure that your needle is lowered into the fabric for easy turning.Once completed tear of the stabilizer.
*Step 5*
This ones easy
Practice,Practice, Practice and most of all have fun

nooshka xx
If you don't class your self as an artist then don't despair.There is plenty of places that you can draw inspiration from.Perfect examples are children's coloring books which often have clear simple pictures in them.Craft magazines, find these at your local library.They usually have a insert with applique designs on them. The key is to start easy.Try not to go for a complicated design with lots of curves and sharp angles.Also keep in mind that your image when drawn and fused to the fabric will be a mirror image.This is especially important when doing names.It may pay to reverse your image on photocopier first.
*Step 1*
Draw or trace your design to the paper side of your paper backed fusible webbing.Cut around your design leaving a 1/2" border.

Take your design and iron it on (fusible side down) on to the wrong side of your heart fabric.Let the fused design cool completely before carefully cutting it out following the drawn line.


*Step 3*
Next is to take your backing fabric and place the tearaway stabilizer behind it.Stabilizer is very important to ensure a pucker free finish.It also make your job a lot easier.It can be brought cheaply by the meter and it has a paper feel to it.Once you have completed your design it simple tears away leaving you with a perfect finish.

Now take your design and peel away the paper backing.This will reveal the fusible webbing.Iron your design onto your stabilized backing fabric and you are ready to rock 'n ' roll!

*Step 4*

Line up the edge of your fabric so that the vertical part of the stitch is running just along the raw edge of the fabric.The needle will then swing to the left to create the blanket stitch.Take it slowly until you get used to the stitch sequence so that when you approach corners you will no when to stop and pivot. make sure that your needle is lowered into the fabric for easy turning.Once completed tear of the stabilizer.
*Step 5*
This ones easy
Practice,Practice, Practice and most of all have fun


No comments:
Post a Comment